
myFlowForge 使用文档Using myFlowForge
本文档覆盖安装、代理配置、会话、工作流编排、远程连接与扩展。文档随应用更新;如与应用界面不一致,以应用为准,并请提交 issue。 Covers installation, agent configuration, sessions, workflow orchestration, remote access and extensions. These docs track the app; where they differ, the app is authoritative. Please open an issue.
快速开始Quick start
myFlowForge 不保存 API Key,也不转发请求。它驱动本机已安装并已登录的编码 CLI,将其输入输出接入统一界面。使用前需要至少一个可用的 CLI。 myFlowForge stores no API keys and proxies no requests. It drives the coding CLIs already installed and authenticated on your machine and connects their input and output to a single interface. At least one working CLI is required.
1 · 装好至少一个编码代理1 · Install at least one coding agent
能在终端中运行的 CLI 即可被 myFlowForge 驱动。例如: Any CLI that runs in your terminal can be driven by myFlowForge. For example:
npm i -g @anthropic-ai/claude-code   # Claude Code
npm i -g @openai/codex              # Codex
npm i -g @google/gemini-cli         # Gemini
安装后分别登录一次(首次运行 claude / codex / gemini 会进入登录流程)。Cursor、qoder 等随编辑器安装的 CLI 需要在 PATH 中可见。
Sign in to each once (the first run of claude / codex / gemini starts the login flow). CLIs that ship with an editor, such as Cursor or qoder, must be on your PATH.
2 · 安装 myFlowForge2 · Install myFlowForge
从下载页下载对应架构的 .dmg。应用尚未进行代码签名,首次打开需右键 → 打开,详见下载页。
Download the .dmg for your architecture from the download page. The app is not code-signed yet, so the first launch requires right-click → Open. See the download page for details.
3 · 建一个工作区3 · Create a workspace
在首页点击「新建工作区」,选择一个或多个本地仓库。myFlowForge 为每个项目创建独立的 git worktree,代理的改动提交在分支上,不影响当前工作副本。也可以通过「打开本地目录」直接打开已有目录。 Click New workspace on the home screen and select one or more local repositories. myFlowForge creates an isolated git worktree per project; agent edits land on a branch and do not touch your current working copy. Alternatively, use Open a local folder for an existing directory.
4 · 发起对话4 · Start a conversation
进入工作区,在输入框下方选择代理和模型,然后输入任务。如需按流程执行,在右侧「工作流」面板点击「启动」,或在输入框输入 / 选择一条工作流。
Open the workspace, select an agent and model below the composer, and enter your task. To run a workflow, click Start in the Workflow panel on the right, or type / in the composer and select one.
导入历史会话Importing session history
myFlowForge 可以只读扫描本机 Claude / Codex / Cursor / qoder 的历史会话,并导入为工作区,在原有上下文上继续对话。 myFlowForge can scan local Claude / Codex / Cursor / qoder session history (read-only) and import it as a workspace, so the conversation continues with its existing context.
核心概念Core concepts
myFlowForge 使用以下五个基本概念。 myFlowForge is built on five terms.
| 概念Term | 是什么What it is |
|---|---|
| 工作区Workspace | 一组工作的容器。可包含一个仓库,也可包含多个仓库(如前端 / 后端 / SDK)。每个仓库有独立的 git worktree。 A container for a unit of work. Holds one repo or several (e.g. frontend + backend + SDK). Each repo has its own git worktree. |
| 项目Project | 工作区中的一个仓库。设为「按项目扇出」的阶段会为每个项目各启动一个代理。 A repo within a workspace. A stage set to fan out per project starts one agent per project. |
| 会话Session | 一条对话线程。一个工作区可包含多条会话,上下文彼此隔离。 A conversation thread. A workspace can hold several; their contexts are isolated. |
| 编码代理Coding agent | 本机安装的 CLI(Claude Code、Codex 等),由 myFlowForge 驱动。 A CLI installed locally (Claude Code, Codex, etc.), driven by myFlowForge. |
| 阶段Stage | 工作流中的一个步骤,例如「技术方案设计」。每个阶段独立配置代理、模型、权限档位和扇出方式。 A step in a workflow, e.g. Design. Each stage has its own agent, model, permission mode and fan-out setting. |
编码代理Coding agents
设置 → 编码代理列出所有支持的代理及本机探测结果:是否安装、版本、是否有更新。当前支持 14 个: Settings → Coding agents lists every supported agent with local detection results: installed or not, version, and available updates. Fourteen are currently supported:
Claude Code · Codex · Cursor · Gemini · qoder · opencode · Qwen · Copilot · Pi · Kimi · Reasonix · Trae · Antigravity · DeepSeek
DeepSeek(DeepSeek Harness)DeepSeek (DeepSeek Harness)
DeepSeek Harness 没有单独的 headless 开关,而是通过 profile 选择运行形态(网页版、无头、ACP、SDK 各为一个 profile)。myFlowForge 使用 headless profile。
DeepSeek Harness has no headless flag; it selects a runtime mode by profile (web, headless, ACP and SDK are each a profile). myFlowForge uses the headless profile.
npm install -g @deepseek-ai/dsh
dsh web # 打开浏览器的 Models 页存 key / opens the Models page to store your key- API Key:通过上面的
dsh web保存,或设置export DEEPSEEK_API_KEY=…。未配置时每一轮都会立即返回MISSING_CREDENTIAL。 API key: store it withdsh webabove, or setexport DEEPSEEK_API_KEY=…. Without a key, every turn returnsMISSING_CREDENTIALimmediately. - 权限档:三档分别对应其
read-only/workspace-write/danger-full-access,无需额外配置。 Permission modes: the three tiers map to itsread-only/workspace-write/danger-full-access. No extra configuration is needed. - 模型:
headless不提供选择模型的命令行参数,因此列表中只有「账号默认」。 Models: theheadlessprofile has no model flag, so only "account default" is listed.
Trae(字节 TraeCode CLI)Trae (ByteDance TraeCode CLI)
Trae 不通过 npm 分发,需使用官方脚本安装到 ~/.local/bin,二进制名为 traecli。
Trae is not distributed on npm. The official script installs it to ~/.local/bin; the binary is traecli.
sh -c "$(curl -L https://trae.cn/trae-cli/install.sh)"
# 装完把 ~/.local/bin 加进 PATH / then put ~/.local/bin on your PATH
traecli # 首次运行,登录 / first run, sign in- 模型:CLI 不提供指定模型的命令行参数,因此列表中只有「账号默认」。切换模型需在 traecli 中使用
/model,或修改trae_cli.yaml。 Models: the CLI has no model flag, so only "account default" is listed. To switch, use/modelinside traecli or edittrae_cli.yaml. - 无人值守修改文件:运行
traecli config edit,将permission_mode设为bypass_permissions。否则工作流执行到该阶段时会停在权限确认。 Unattended edits: runtraecli config editand setpermission_modetobypass_permissions. Otherwise a workflow stalls on a permission prompt at that stage. - 无头 / CI:使用
TRAECLI_PERSONAL_ACCESS_TOKEN环境变量代替交互式登录。 Headless / CI: use theTRAECLI_PERSONAL_ACCESS_TOKENenvironment variable instead of interactive login.
模型发现Model discovery
每个代理的可用模型从其本地配置读取:Codex 读取 models_cache.json,Cursor 执行 cursor models,opencode 执行 opencode models。列表与账号实际可用的模型一致,不会列出运行时不可用的模型。
Each agent's model list is read from its local configuration: Codex from models_cache.json, Cursor via cursor models, opencode via opencode models. The list matches what your account can run; models unavailable at runtime are not listed.
列表支持手动编辑。代理新增模型但探测尚未识别时,可在设置中手动添加;手动添加的条目不会被下次刷新覆盖。 The list can be edited manually. If an agent supports a model that detection does not yet pick up, add it in Settings. Manual entries persist across refreshes.
opencode
opencode 是多厂商网关。接入 opencode 后,其中已配置的所有厂商均可在 myFlowForge 中使用。对于 myFlowForge 尚未单独适配的模型,推荐通过 opencode 接入。 opencode is a multi-vendor gateway. Once connected, every vendor configured in opencode is available in myFlowForge. Use it for models myFlowForge does not support directly.
代理与时区Proxies and timezone
每个 provider 可单独配置网络代理和 TZ 时区(部分 CLI 会将时区写入 prompt)。留空表示继承系统环境;显式设为空会移除继承的代理变量。
Each provider can have its own network proxy and TZ timezone (some CLIs include the timezone in the prompt). Leave blank to inherit from the environment; setting it explicitly to empty removes inherited proxy variables.
会话与换模型Sessions & switching models
在 myFlowForge 中,代理和模型是每一轮消息的属性,而非会话的属性。 In myFlowForge, the agent and model are per-turn properties, not per-session.
输入框下方有三个选择器:代理、模型、权限档位,可在发送每条消息前修改。常见用法: Three pickers sit below the composer: agent, model and permission mode. Each can be changed before any message. Common uses:
- 用 Claude Opus 设计方案,切换到 Codex GPT-5 实现,再用低成本模型处理收尾工作。 Design with Claude Opus, implement with Codex GPT-5, and use a lower-cost model for cleanup tasks.
- 当前模型无进展或输出偏离时切换模型。新模型可读取此前的对话,无需重述背景。 Switch models when one stalls or drifts. The new model sees the prior conversation; no need to restate context.
- 某个 provider 额度耗尽时,切换到其他 provider,在同一会话中继续。 When a provider's quota runs out, switch to another and continue in the same session.
上下文传递Context carry-over
支持原生续聊的代理(Claude Code、Codex、Cursor、qoder、opencode)基于自身的会话历史继续。其余代理由 myFlowForge 根据会话中已有的消息重建上下文后传入。两种方式在使用上没有区别。 Agents with native resume (Claude Code, Codex, Cursor, qoder, opencode) continue from their own session history. For other agents, myFlowForge rebuilds the context from the thread's messages and passes it in. Both paths behave the same from the user's side.
斜杠命令Slash commands
输入 / 打开菜单,包含工作流触发项,以及本机实际存在的命令 / prompt 文件和已安装的 Skill。菜单按当前代理过滤,只列出该代理可用的项。
Typing / opens a menu of workflow triggers, plus command/prompt files and installed skills that exist on disk. The menu is filtered to items the current agent supports.
跨项目同时开发Working across projects
一个需求常同时涉及前端和后端。将相关仓库放入同一工作区后,myFlowForge 将其作为一项工作统一处理。 A single feature often spans frontend and backend. Repos placed in the same workspace are handled by myFlowForge as one unit of work.
扇出Fan-out
阶段有两种执行方式: A stage runs in one of two modes:
- 单代理Single agent — 在工作区根目录执行一次。适用于需要全局视角的阶段,如需求评估、方案设计。 runs once at the workspace root. Use for stages that need a global view, such as requirement and design.
- 按项目扇出Fan out per project — 为每个选中的项目各启动一个代理,并行执行,每个代理在独立泳道中显示进度。适用于代码开发、单元测试。 starts one agent per selected project, running in parallel, each with its own progress lane. Use for develop and test.
扇出可以只选择部分项目。例如分析全部五个仓库,只在其中两个仓库中修改代码。 Fan-out can target a subset of projects, for example analysing all five repos but writing code in only two.
隔离与合并Isolation and merging
每个项目使用独立的 worktree,代理之间互不干扰。运行结束后,在「变更」面板中逐文件审阅 diff,然后合并或整体丢弃。工作区存在未提交改动时,工作流拒绝启动,以免将未提交的改动带入。 Each project uses its own worktree, so agents do not interfere with each other. After a run, review diffs file by file in the Changes panel, then merge or discard them. A workflow will not start on a dirty tree, so uncommitted changes are never included.
权限档位Permission modes
权限档位决定代理的访问范围,共三档。可按会话设置,也可为工作流中的单个阶段单独设置。 Permission modes control what an agent can access. There are three levels, set per session or per workflow stage.
| 档位Mode | 含义Meaning | 典型用途Use it for |
|---|---|---|
| 只读审阅Read-only | 只读代码并给出方案,不修改文件reads and proposes; writes nothing | 需求评估、方案设计、代码 CRrequirement, design, code review |
| 自动(工作区)Auto (workspace) | 自动修改工作区内文件,不联网,不访问工作区外(默认)edits inside the workspace; no network, no access outside (default) | 大多数编码任务most coding work |
| 完全访问Full access | 不受限地访问文件与网络unrestricted files and network | 安装依赖、获取外部资料installing deps, fetching external material |
适用范围Supported agents
档位映射到各 CLI 自身的沙箱范围,因此仅对自带沙箱的代理(Claude Code、Codex、qoder)生效。Cursor、opencode、Gemini 的行为固定,不受档位影响,界面中会标明。 Modes map to each CLI's own sandbox scope, so they only take effect on agents that have a sandbox: Claude Code, Codex and qoder. Cursor, opencode and Gemini behave the same in every mode; the UI indicates this.
远程主机Remote hosts
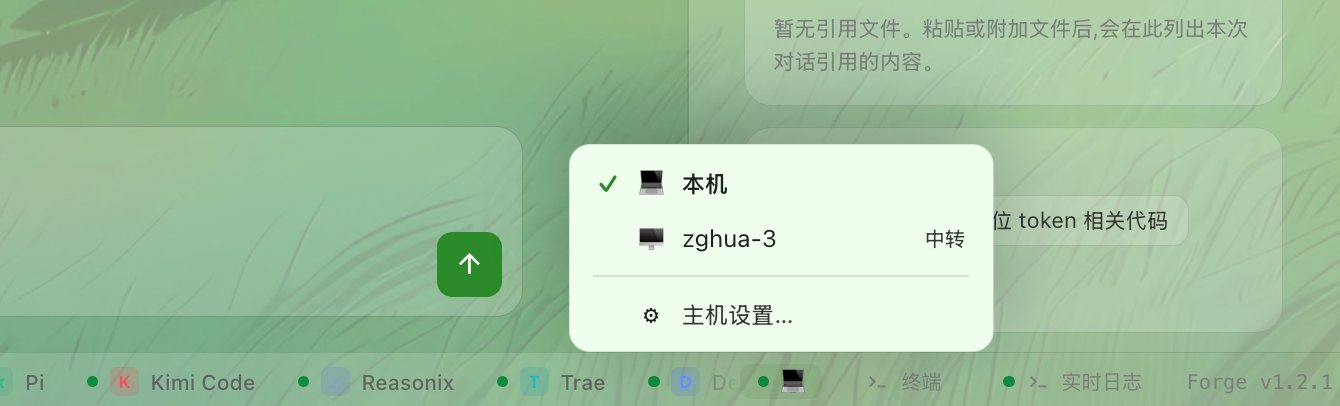
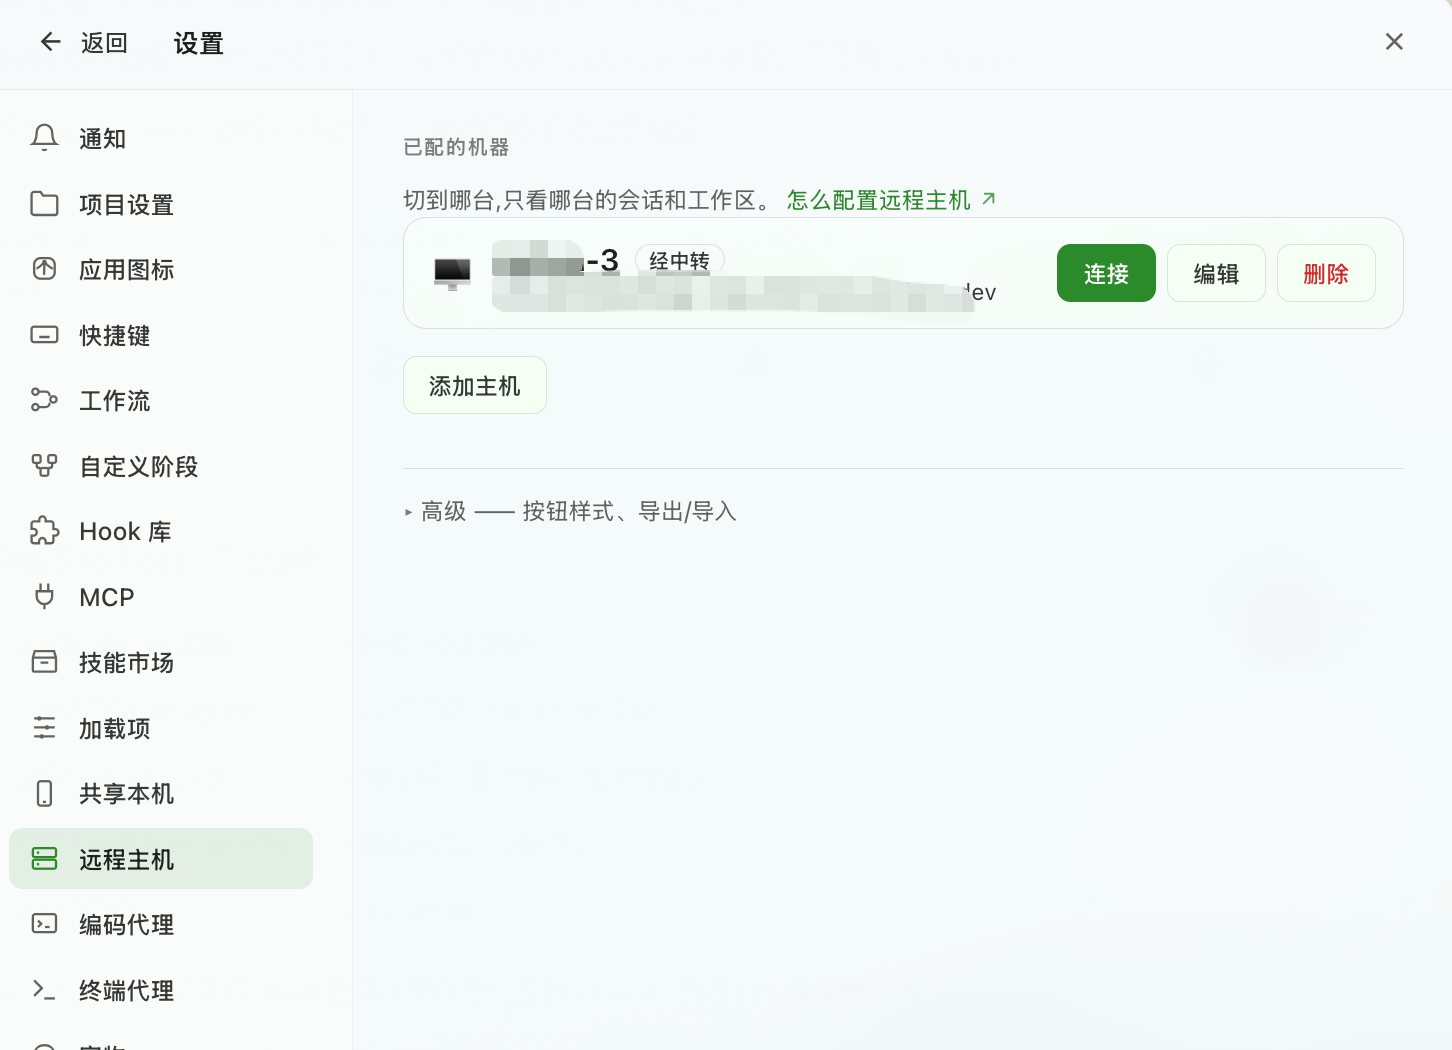
myFlowForge 支持连接远程主机。底部状态栏最左侧(「终端」按钮旁)为主机切换。切换后,工作区列表、会话、运行中的代理、git 改动、内置终端均切换为目标主机的内容。代理在目标主机上运行、读取其仓库、修改其文件;本机仅负责界面显示。 myFlowForge can connect to remote hosts. The leftmost control in the status bar (next to the Terminal button) is the host switch. Selecting a host switches the workspace list, sessions, running agents, git changes and built-in terminal to that machine. Agents run on the remote host and read and edit its repos; the local machine only renders the UI.
连接方式Connection methods
| 方式Method | 适用场景Use when | 前提条件Requirements |
|---|---|---|
| 直连Direct | 两台机器在同一局域网,或目标主机有公网 IPBoth machines are on the same LAN, or the target host has a public IP | 目标主机运行 myFlowForge 或 daemon,端口可达。使用令牌鉴权The target runs myFlowForge or the daemon on a reachable port. Token authentication |
| SSH | 已能通过 SSH 登录目标主机You already have SSH access to the host | 复用现有 SSH 登录,无需开放新端口Reuses existing SSH login; no additional port required |
| 中转Relay | 两台机器之间网络不可达,例如目标主机位于 NAT 后The machines cannot reach each other, e.g. the target is behind NAT | 一台中转服务器,见「搭一个中转」A relay server. See Set up a relay |
三种方式相互独立,不构成降级链。局域网直连和中转可同时启用,共用同一配对码和令牌:在局域网内走直连,离开局域网后自动走中转。 The three methods are independent, not a fallback chain. Direct and relay can be enabled at the same time with one pairing code and one token: direct on the LAN, relay automatically when away from it.
配对Pairing
-
1
在目标主机上生成配对码Generate a code on the target host
打开 设置 → 手机,页面显示二维码和配对码(包含地址、令牌、公钥)。使用中转时,中转地址也在此页填写。 Open Settings → Phone. The screen shows a QR code and a pairing code (address, token and public key). When using a relay, enter the relay address on this screen as well.
-
2
手机:扫码Phone: scan the code
在手机端点击「+」→ 扫一扫,扫描二维码完成配对。 In the phone client, tap + → Scan and scan the QR code.
-
3
其他电脑:粘贴配对码Another computer: paste the code
在该电脑上打开 设置 → 远程主机,粘贴配对码。 On that computer open Settings → Remote hosts and paste the pairing code.
无图形界面的主机Headless hosts
Linux 服务器上运行 daemon,即不含界面的同一份代码。执行 myflowforge-daemon pair 会在终端中输出二维码,手机可直接扫描 SSH 窗口中的二维码。
On a Linux server, run the daemon, which is the same codebase without the UI. myflowforge-daemon pair prints a QR code in the terminal that the phone can scan from the SSH window.
搭一个中转Set up a relay
当目标主机位于 NAT 后、客户端无法直接访问时,需要通过中转服务器建立连接。本节介绍两种部署方式:Cloudflare Workers(无需自行维护服务器)和自有服务器。完整部署约需十分钟。 A relay is needed when the target host is behind NAT and not directly reachable. This section covers two deployment options: Cloudflare Workers (no server to maintain) and your own server. Setup takes about ten minutes.
是否需要中转When a relay is not needed
如果目标主机有公网 IP,或已在使用 Tailscale / ZeroTier / frp 等工具,建议使用直连。直连使用相同的端到端加密,安全性相同,且少一跳。中转仅适用于上述条件都不满足的情况。 If the target host has a public IP, or you already use Tailscale / ZeroTier / frp, use a direct connection. It uses the same end-to-end encryption with one fewer hop. A relay is intended only for cases where none of these apply.
工作原理How the relay works
中转是一个无状态的转发管道。两端通过相同的房间号在中转上匹配,之后中转只负责在两端之间原样转发数据。 The relay is a dumb pipe. Both ends are matched by the same room number; after that the relay forwards data between them unchanged.
- 房间号由计算得出,无需注册,其值为电脑端的长期公钥。两端各自计算得出,因此中转无需识别用户身份,没有账号、密钥或配置文件,部署后即可使用。 The room number is computed, not registered: it is the computer's long-term public key. Both ends derive it independently, so the relay does not need to identify users. There are no accounts, keys or config files; the relay works as soon as it is deployed.
- 中转无法读取内容。两端之间为端到端加密,经过中转的数据均为密文,中转不持有密钥。 The relay cannot read content. Traffic is end-to-end encrypted; everything passing through is ciphertext, and the relay holds no key.
- 中转最多只能丢弃数据,即拒绝服务,不会导致信息泄露。因此可以使用他人部署的中转,也可以将自己的中转提供给他人使用。 At worst, a relay can drop traffic: denial of service, not disclosure. It is therefore safe to use a relay run by someone else, or to share yours.
- 所有部署使用同一份代码,无需定制构建。 Every deployment runs the same code. No custom build is required.
方式一 · Cloudflare WorkersOption 1 · Cloudflare Workers
推荐方式。无需购买服务器、管理进程或配置 TLS。中转会转发全部流量,部署在 Cloudflare 上时带宽由 Cloudflare 承担,不占用自有 VPS 的带宽。免费额度足以支持个人的几台设备。 Recommended. No server to buy, no process to manage and no TLS to configure. A relay forwards all traffic; on Cloudflare, bandwidth is on Cloudflare rather than your own VPS. The free tier is sufficient for a few personal devices.
-
1
准备:一个 Cloudflare 账号 + Node.js 20 以上Prerequisites: a Cloudflare account and Node.js 20+
账号可免费注册。运行
node -v,输出需为v20或更高。 Accounts are free. Runnode -v; the output must bev20or later. -
2
获取中转源码Get the relay source
中转源码位于主仓库的
relay/目录: The relay source is in therelay/directory of the main repo:
git clone https://github.com/flowForges/myFlowForge.git
cd myFlowForge/relay-
3
安装依赖并登录 CloudflareInstall dependencies and log in to Cloudflare
wrangler login会打开浏览器,点击「Allow」后终端即完成登录。wrangler loginopens a browser; click Allow to complete login in the terminal.
npm install
npx wrangler login-
4
(可选)修改名称(Optional) Set a name
默认名称为
myflowforge-relay,会出现在最终地址中。如需修改,编辑wrangler.toml第一行的name。不要修改其他行,尤其是底部的new_sqlite_classes迁移;该配置出错会导致 Worker 无法休眠并持续计费。 The default ismyflowforge-relay, which appears in the final address. To change it, edit thenameline at the top ofwrangler.toml. Do not change any other line, in particular thenew_sqlite_classesmigration at the bottom; if it is broken, the Worker never sleeps and is billed continuously. -
5
部署Deploy
首次部署会提示是否创建 Worker,按回车确认。 On first deploy, it asks whether to create the Worker. Press Enter to confirm.
npx wrangler deploy-
6
记录输出的地址Note the printed address
部署成功后,终端末尾会输出类似
https://myflowforge-relay.你的账号.workers.dev的地址。将开头的https替换为wss,并保留末尾斜杠,即为 app 中填写的地址: On success, the last lines print an address such ashttps://myflowforge-relay.your-account.workers.dev. Replace the leadinghttpswithwssand keep a trailing slash. This is the address to enter in the app:
wss://myflowforge-relay.你的账号.workers.dev/-
7
健康检查Health check
通过
https地址访问/healthz,应返回ok: Request/healthzon thehttpsaddress. It should returnok:
curl https://myflowforge-relay.你的账号.workers.dev/healthz
# → ok
方式二 · 自有服务器Option 2 · Self-hosted server
适用于在自有 VPS 上部署。中转没有原生依赖(两百多行 TypeScript,运行时依赖仅有纯 JS 的 ws),Docker 为可选项,以下两种方式任选其一。
For deployment on your own VPS. The relay has no native dependencies (a couple hundred lines of TypeScript; the only runtime dependency is ws, pure JS), so Docker is optional. Use either method below.
-
1
在服务器上获取源码Get the source on the server
git clone https://github.com/flowForges/myFlowForge.git
cd myFlowForge/relay-
2a
使用 Docker 运行Run with Docker
仓库包含
Dockerfile。容器在重启后自动启动。 ADockerfileis included. The container restarts automatically after a reboot.
docker build -t myflowforge-relay .
docker run -d --restart=always -p 8787:8787 --name relay myflowforge-relay-
2b
不使用 Docker 直接运行Run without Docker
仅读取两个环境变量:
PORT(默认 8787)和HOST(默认 0.0.0.0)。 It reads only two environment variables:PORT(default 8787) andHOST(default 0.0.0.0).
npm install
npm run build
npm start-
3
配置开机自启(非 Docker)Start on boot (non-Docker)
将构建产物复制到
/opt/myflowforge-relay,并创建专用用户: Copy the build output to/opt/myflowforge-relayand create a dedicated user:
sudo mkdir -p /opt/myflowforge-relay
sudo cp -r dist node_modules package.json /opt/myflowforge-relay/
sudo useradd --system --no-create-home --shell /usr/sbin/nologin myflowforge
sudo chown -R myflowforge:myflowforge /opt/myflowforge-relay
新建 /etc/systemd/system/myflowforge-relay.service,完整内容如下:
Create /etc/systemd/system/myflowforge-relay.service with the following complete contents:
[Unit]
Description=myFlowForge relay
After=network.target

[Service]
Type=simple
User=myflowforge
WorkingDirectory=/opt/myflowforge-relay
ExecStart=/usr/bin/node dist/main.js
Environment=PORT=8787
Environment=HOST=127.0.0.1
Restart=always
RestartSec=3

[Install]
WantedBy=multi-user.target注意:HOST 设为 127.0.0.1 而非 0.0.0.0。下一步会在前面加 TLS,外部访问应只经过 443 端口。绑定 0.0.0.0 会使明文端口 8787 暴露在公网,绕过 TLS。仅在不配置 TLS、只在局域网测试时改为 0.0.0.0。
Note: HOST is 127.0.0.1, not 0.0.0.0. The next step places TLS in front, and external traffic should enter only on 443. Binding 0.0.0.0 exposes plaintext port 8787 to the internet and bypasses TLS. Use 0.0.0.0 only when testing on a LAN without TLS.
保存后启用服务:Save the file and enable the service:
sudo systemctl daemon-reload
sudo systemctl enable --now myflowforge-relay
sudo systemctl status myflowforge-relay-
4
配置 TLS(必需,否则 iPhone 无法连接)Configure TLS (required for iPhone)
iOS 会拦截明文连接。发布版 iPhone App 受 ATS 限制(
NSAllowsArbitraryLoads=false),公网ws://地址无法连接,仅放行局域网地址。因此自建中转如需支持 iPhone,必须配置 TLS。安卓允许明文连接,但仍建议统一使用 TLS。
此外,内容本身已是密文,TLS 的作用是防止链路上的第三方识别通信对象。推荐使用 Caddy,它会自动申请并续期证书。TLS 需要域名,Let's Encrypt 不为纯 IP 签发证书。 iOS blocks cleartext connections. Release builds of the iPhone app run under ATS (NSAllowsArbitraryLoads=false), so publicws://addresses cannot connect; only LAN addresses are allowed. A self-hosted relay that must support iPhones requires TLS. Android allows cleartext, but TLS is still recommended for all devices.
Since the payload is already ciphertext, TLS additionally prevents observers on the path from identifying who is communicating. Caddy is recommended; it obtains and renews certificates automatically. TLS requires a domain name; Let's Encrypt does not issue certificates for bare IPs.
/etc/caddy/Caddyfile 完整内容(将域名替换为自己的域名):
Complete /etc/caddy/Caddyfile (replace the domain with your own):
relay.example.com {
  reverse_proxy 127.0.0.1:8787
}
保存后执行 sudo systemctl reload caddy,证书由 Caddy 自动签发。
Then run sudo systemctl reload caddy; Caddy obtains the certificate automatically.
已运行 nginx 的服务器Servers already running nginx
Caddy 需要占用 80 端口(用于 ACME HTTP-01 验证)。如果 80 端口已被 nginx 占用,不要安装 Caddy,改为在 nginx 中增加一个 server 块。注意:nginx 不会自动处理 WebSocket 升级,下面四行头必须手动配置。缺少时 curl /healthz 正常,但 App 无法连接。
Caddy requires port 80 (used by the ACME HTTP-01 challenge). If nginx already uses port 80, do not install Caddy; add a server block to nginx instead. Note: nginx does not upgrade WebSockets automatically; the four headers below must be set explicitly. Without them, curl /healthz succeeds but the app cannot connect.
# /etc/nginx/conf.d/relay.example.com.conf
server {
    listen 80;
    server_name relay.example.com;

    location / {
        proxy_pass http://127.0.0.1:8787;

        # 这四行是 WebSocket 的命门,少一行 App 就连不上
        proxy_http_version 1.1;
        proxy_set_header Upgrade $http_upgrade;
        proxy_set_header Connection "upgrade";
        proxy_set_header Host $host;

        # 长连接:心跳 30 秒一次,默认 60 秒读超时会误杀空闲连接
        proxy_read_timeout 3600s;
        proxy_send_timeout 3600s;
    }
}
使用 certbot 签发证书。certbot 通过 nginx 现有的 80 端口完成验证,无需停机: Issue the certificate with certbot. It completes the challenge through nginx's existing port 80 without downtime:
sudo nginx -t && sudo systemctl reload nginx
sudo apt install -y certbot python3-certbot-nginx
sudo certbot --nginx -d relay.example.com --redirect
# certbot 改完配置后,确认那四行 WebSocket 头还在 443 的 server 块里
两种方式配置完成后,app 中填写的地址均为: With either setup, the address to enter in the app is:
wss://relay.example.com/-
5
健康检查Health check
自建版的
/healthz返回 JSON,包含当前房间数和连接数,可用于确认 app 是否已连接。仅返回数量,不返回房间号。 The self-hosted/healthzreturns JSON with the current room and connection counts, which shows whether the app has connected. It reports counts only, not room identifiers.
curl https://relay.example.com/healthz
# → {"ok":true,"rooms":1,"connections":2}
方式三 · 通过 AI 代理部署Option 3 · Deploy with an AI agent
如果服务器上安装了可执行命令的 AI 代理(如 Claude Code、Codex),可将以下提示词完整粘贴给它。代理会检查环境、安装依赖、配置 systemd、在 Caddy 与 nginx 之间选择,并输出验证结果。提示词中已包含实际部署中遇到的已知问题及处理方式。 If the server has an AI agent that can run commands (e.g. Claude Code, Codex), paste the entire prompt below into it. The agent inspects the environment, installs dependencies, configures systemd, chooses between Caddy and nginx, and reports the verification output. The prompt covers known issues encountered in real deployments.
前置准备Before you start
将提示词中所有 <我的域名> 替换为实际域名(如 relay.example.com),并预先将该域名的 A 记录指向此服务器。证书按域名签发,DNS 未生效时流程会停在证书签发步骤。
Replace every <MY DOMAIN> with your domain (e.g. relay.example.com), and point its A record at this server beforehand. Certificates are issued per domain; if DNS is not in place, the run stops at certificate issuance.
请在这台服务器上部署 myFlowForge 的「中转」(relay)。严格按下面执行,不要自己发挥,不要改动上游代码。

【它是什么】一个哑管道:一台电脑和若干手机/电脑靠同一个房间号在这里碰头,它只负责把 A 说的话
原样念给 B 听。没有账号、没有密钥、没有配置文件、不落盘。内容是端到端加密的,中转只看得到密文。
所以不要加鉴权、不要留访问日志、不要做统计。运行时依赖只有一个纯 JS 的 ws,没有原生模块,不需要 Docker。

【必须满足】
1. 跑在 systemd 下,开机自启,崩了自动重启
2. 进程只监听 127.0.0.1:8787,不直接对公网开放
3. 对外用 https://<我的域名> ,证书自动申请并续期
4. wss://<我的域名> 能完成 WebSocket 握手并收到中转的应答帧
※ TLS 不是可选项:iOS 的 ATS 会拦掉公网明文 ws://,不上 TLS 等于 iPhone 用不了。

【步骤】
1) 先报告环境:发行版、架构、node 版本、80/443 是否被占用、被谁占用、防火墙类型。
2) 装 Node 20+(已有就跳过)。
3) 取源码(只取 relay 子目录,别 clone 整个仓库):
   git clone --depth 1 --filter=blob:none --sparse https://github.com/flowForges/myFlowForge.git
   cd myFlowForge && git sparse-checkout set relay
   然后先把 relay/README.md 读一遍。
4) 构建:cd relay && npm ci && npm run build
   不通过就停下来把完整报错给我,不要改 tsconfig 或源码绕过去。
5) systemd 服务,Environment=HOST=127.0.0.1、PORT=8787,ExecStart 用 which node 的真实路径。
   ★如果代码装在 /home 下,ProtectHome 必须写 read-only,不能写 true —— 写 true 服务看不见
     /home,表现为「找不到 dist/main.js」,很容易查错方向。
   起来后 curl http://127.0.0.1:8787/healthz 必须返回 {"ok":true,"rooms":0,"connections":0}。
6) 反代 + TLS:
   · 80 端口空闲 → 用 Caddy,Caddyfile 只需要:
       <我的域名> { reverse_proxy 127.0.0.1:8787 }
   · 80 已被 nginx 占用 → 不要装 Caddy,给 nginx 加一个 server 块 + certbot --nginx。
     ★nginx 必须手写 WebSocket 升级头,Caddy 会自动处理而 nginx 不会:
       proxy_http_version 1.1;
       proxy_set_header Upgrade $http_upgrade;
       proxy_set_header Connection "upgrade";
       proxy_set_header Host $host;
       proxy_read_timeout 3600s;
     漏掉的症状是 curl /healthz 正常但 App 一个都连不上。
7) 防火墙只放行 22/80/443。确认 ss -lntp 里 8787 的监听地址是 127.0.0.1 而不是 0.0.0.0。

【验证 —— 两条都要跑,把完整输出给我】
A) curl -s https://<我的域名>/healthz   期望 {"ok":true,"rooms":0,"connections":0}
B) 真建一次 WebSocket(关键。healthz 通只证明 HTTP 通,不证明 WebSocket 升级穿过了反代):
   cd 到 relay 目录,写 /tmp/wstest.mjs:
     import WebSocket from 'ws'
     const ws = new WebSocket('wss://<我的域名>')
     const t = setTimeout(() => { console.log('FAIL: 10 秒无应答'); process.exit(1) }, 10000)
     ws.on('open', () => {
       console.log('OPEN')
       ws.send(JSON.stringify({ t:'join', role:'client', room:'AAAAAAAAAAAAAAAAAAAAAAAAAAAAAAAA' }))
     })
     ws.on('message', m => { console.log('RECV:', m.toString()); clearTimeout(t); process.exit(0) })
     ws.on('error', e => { console.log('FAIL:', e.message); process.exit(1) })
   node /tmp/wstest.mjs
   期望看到 OPEN 和 RECV: {"t":"relay","status":"waiting"}
   收到 waiting 就说明 TLS → 反代 → WebSocket 升级 → 中转撮合逻辑整条通了。跑完删掉这个文件。

【不要做】不要改 relay/ 下的源码;不要加鉴权/日志/统计;不要为了「能用」退回明文 ws://;
不要把它当公共中转对外开放(中转是全流量转发,带宽会被所有用它的人一起花掉)。
Deploy the myFlowForge relay on this server. Follow this exactly — do not improvise, do not
modify upstream code.
WHAT IT IS: a dumb pipe. One computer and a few phones/computers meet by the same room number and
all it does is repeat what A said to B, verbatim. No accounts, no keys, no config file, nothing
written to disk. Traffic is end-to-end encrypted, so the relay only ever sees ciphertext. Therefore:
do not add authentication, do not keep access logs, do not add analytics. The only runtime
dependency is ws (pure JS) — no native modules, no Docker needed.
REQUIREMENTS
1. Runs under systemd, starts at boot, restarts on crash
2. The process listens on 127.0.0.1:8787 only, never directly on a public interface
3. Public entry is https://<MY DOMAIN> with automatic certificate issuance and renewal
4. wss://<MY DOMAIN> completes a WebSocket handshake and returns a relay frame
NOTE: TLS is not optional. iOS ATS blocks public cleartext ws://, so skipping TLS means iPhones
cannot use the relay at all.
STEPS
1) Report the environment first: distro, architecture, node version, whether 80/443 are in use and
by what, firewall type.
2) Install Node 20+ (skip if present).
3) Get the source — sparse-checkout the relay subdirectory, do not clone the whole repo:
git clone --depth 1 --filter=blob:none --sparse https://github.com/flowForges/myFlowForge.git
cd myFlowForge && git sparse-checkout set relay
Then read relay/README.md before going further.
4) Build: cd relay && npm ci && npm run build
If it fails, stop and show me the full error. Do not edit tsconfig or sources to get around it.
5) systemd unit with Environment=HOST=127.0.0.1, PORT=8787, and ExecStart using the real path from
`which node`.
NOTE: if the code lives under /home, ProtectHome must be read-only, never true. With true the
service cannot see /home at all and reports "cannot find dist/main.js", which sends you hunting
in the wrong place.
Once up, curl http://127.0.0.1:8787/healthz must return {"ok":true,"rooms":0,"connections":0}.
6) Reverse proxy + TLS:
- Port 80 free -> use Caddy. The whole Caddyfile is:
<MY DOMAIN> { reverse_proxy 127.0.0.1:8787 }
- Port 80 taken by nginx -> do NOT install Caddy. Add an nginx server block + certbot --nginx.
NOTE: nginx needs the WebSocket upgrade headers written by hand; Caddy does this automatically
and nginx does not:
proxy_http_version 1.1;
proxy_set_header Upgrade $http_upgrade;
proxy_set_header Connection "upgrade";
proxy_set_header Host $host;
proxy_read_timeout 3600s;
Omitting them looks fine to curl /healthz while no app can connect at all.
7) Firewall: allow 22/80/443 only. Confirm via ss -lntp that 8787 listens on 127.0.0.1, not 0.0.0.0.
VERIFY — run both, give me the full output
A) curl -s https://<MY DOMAIN>/healthz expect {"ok":true,"rooms":0,"connections":0}
B) Actually open a WebSocket. This is the one that matters: healthz proves HTTP works, not that the
upgrade survived the proxy. From the relay directory, write /tmp/wstest.mjs:
import WebSocket from 'ws'
const ws = new WebSocket('wss://<MY DOMAIN>')
const t = setTimeout(() => { console.log('FAIL: no answer in 10s'); process.exit(1) }, 10000)
ws.on('open', () => {
console.log('OPEN')
ws.send(JSON.stringify({ t:'join', role:'client', room:'AAAAAAAAAAAAAAAAAAAAAAAAAAAAAAAA' }))
})
ws.on('message', m => { console.log('RECV:', m.toString()); clearTimeout(t); process.exit(0) })
ws.on('error', e => { console.log('FAIL:', e.message); process.exit(1) })
node /tmp/wstest.mjs
Expect OPEN followed by RECV: {"t":"relay","status":"waiting"}
"waiting" means TLS -> proxy -> WebSocket upgrade -> relay matchmaking all work. Delete the file
afterwards.
DO NOT: modify anything under relay/; add auth, logging or analytics; fall back to cleartext ws://
to "make it work"; or open it as a public relay (a relay forwards every byte, so your bandwidth gets
spent by everyone who uses it).在 app 中配置并验证Configure and verify in the app
-
1
电脑端:设置 → 手机 → 填写中转地址On the computer: Settings → Phone → relay address
填写前面得到的
wss://…/地址,然后生成二维码或复制配对码。 Enter thewss://…/address obtained above, then display the QR code or copy the pairing code. -
2
手机端:扫码On the phone: scan the code
-
3
★ 关闭手机 WiFi,通过 4G/5G 测试★ Disable Wi-Fi on the phone and test over mobile data
此步骤必需。手机与电脑在同一 WiFi 下时使用局域网直连,不经过中转,此时连接成功不能证明中转可用。关闭 WiFi 后的测试才会经过中转。 Required. On the same Wi-Fi, the phone connects directly over the LAN and the relay is not used, so a successful connection does not verify the relay. Testing with Wi-Fi off goes through the relay.
不建议作为公共中转开放Do not run a low-bandwidth VPS as a public relay
中转为全流量转发,两端之间的所有数据都经过中转。对外开放时,带宽由所有使用者共同消耗。个人设备使用没有问题;作为公共服务运行需要另行评估容量。 A relay forwards all traffic: every byte between the two ends passes through it. If opened to others, bandwidth is consumed by all users. Personal use across a few devices is fine; running a public service requires separate capacity planning.
故障排查Troubleshooting
| 现象Symptom | 可能原因Likely cause |
|---|---|
| 手机持续加载,电脑端无响应Phone keeps loading; no response on the computer | 先执行 curl …/healthz。无响应:中转未启动,或域名/端口错误。有响应但 connections 为 0:app 中地址填写错误(wss 写成 ws、缺少末尾斜杠,或仍为 https)
Run curl …/healthz first. No response: the relay is not running, or the domain/port is wrong. Responds but connections is 0: the address in the app is wrong (ws instead of wss, missing trailing slash, or still https) |
| 局域网内正常,离开局域网后无法连接Works on the LAN, fails outside it | 局域网内使用的是直连,中转并未连通。关闭手机 WiFi 后重新测试 The LAN connection was direct; the relay was never working. Disable Wi-Fi on the phone and test again |
| 长时间空闲(如一晚)后,两端显示已连接但收不到数据After a long idle period (e.g. overnight), both ends show connected but no data arrives | Worker 为旧版本。执行 git pull 后重新 npx wrangler deploy
Outdated Worker build. Run git pull, then npx wrangler deploy again |
| 更换作为主机的电脑后,手机无法连接Phone cannot connect after switching to a different host computer | 房间号由主机电脑的公钥计算得出,更换主机即更换房间。需重新扫码 The room is derived from the host's public key, so a different host means a different room. Scan the new code |
手机端Phone client
支持 iOS 和安卓。手机端不运行代理,代理仍在电脑上运行,手机端作为远程控制端。 Available on iOS and Android. The phone does not run agents; agents run on the computer and the phone acts as a remote client.
主要用途是在离开电脑时处理代理运行中发起的确认请求。因此在手机端,「门」拥有最高的显示优先级。 Its main purpose is answering confirmation requests from a running agent while away from the computer. Gates therefore have the highest display priority in the app.
功能Features
- 流式对话:思考过程、工具卡、子代理卡,与桌面端一致 Streaming conversation: reasoning, tool cards and sub-agent cards, as on the desktop
- 响应门:权限确认、方案门 Answer gates: permission confirmations and plan gates
- 查看改动:变更列表、文件树、diff Review changes: change list, file tree and diffs
- 创建工作区、编辑工作流:包括工作流模板库 Create workspaces and edit workflows: including the workflow template library
- 切换主机:在多台电脑之间切换 Switch host: switch between multiple computers
- 扫码配对:扫描电脑屏幕或 SSH 窗口中的二维码 Scan to pair: scan the QR code on the computer screen or in an SSH window
markdown、表格和本地图片在手机上原生渲染。远程图片地址显示为链接,不会自动加载。代理输出属于不可信内容,自动加载其中的地址会暴露手机的出口 IP。 Markdown, tables and local images render natively. Remote image URLs are shown as links and not fetched automatically. Agent output is untrusted, and fetching addresses from it would expose the phone's exit IP.
安装Installation
| 平台Platform | 安装方式Method |
|---|---|
| 安卓Android | 从下载页下载 .apk 安装。部分国产系统默认禁止 USB 安装,可通过文件管理器打开安装
Download the .apk from the download page. Some Android skins block USB installs by default; open the file from the file manager instead |
| iOS | 从源码构建:在 mobile/ 目录下使用自己的 Apple ID 签名,通过数据线安装到设备
Build from source: in mobile/, sign with your own Apple ID and install to the device over a cable |
安装后按「远程主机」一节进行配对。同一配对码同时适用于局域网和中转。 After installation, pair as described in Remote hosts. One pairing code covers both LAN and relay.
工作流Workflow
工作流是一种轻量的对话约束机制,不会替代用户决策。核心规则:每个阶段都需要用户点击「下一步」才会推进。 A workflow is a lightweight constraint on the conversation; it does not take decisions away from the user. Core rule: each stage advances only when you click Next.
运行过程Run lifecycle
工作流启动后不会连续执行到结束,而是进入「对话态」: A started workflow does not run straight to completion. It enters conversational mode:
- 顶部显示 ribbon:当前步骤 / 总步骤数 · 当前阶段 · 当前代理。 A ribbon at the top shows: step N of M, current stage, current agent.
- 当前阶段的代理在当前会话中执行,输出、工具调用和修改的文件均直接可见。 The current stage's agent works in the current chat; its output, tool calls and modified files are all visible.
- 可继续对话进行追问、纠正或补充要求,不会重跑整个阶段。 Follow-ups, corrections and additional requirements go into the same conversation and do not re-run the stage.
- 点击 ribbon 上的「下一步」后,才会生成交接稿并交给下一阶段的代理。 Clicking Next on the ribbon generates the handoff note and passes it to the next stage's agent.
交接文档Handoff document
「技术方案设计」阶段将方案写入 markdown 文件(默认路径 forge-docs/design.md),按项目分节说明各项目的工作内容。该文档是跨代理的唯一契约。
The Design stage writes the plan to a markdown file (forge-docs/design.md by default), with one section per project describing its work. This document is the single cross-agent contract.
下游开发代理读取完整文档,再聚焦于自己对应的章节,不使用压缩摘要。开发代理可以对方案提出异议(举报),但不能自行重新设计。 Downstream develop agents read the full document, then focus on their own section; no compressed summary is used. They can flag problems with the plan but cannot redesign it.
门控Gates
标记为「门控」的阶段结束后不会自动推进,而是显示一张待处理的卡片。可选操作: A gated stage does not advance automatically on completion; it shows a card and waits. Available actions:
- 批准:进入下一阶段。Approve: proceed to the next stage.
- 打回:填写修改意见,代理据此重做该阶段。意见会置顶,上一轮产物作为基线传入。 Send back: enter feedback and the agent redoes the stage. The feedback is pinned to the top and the previous output is passed in as the baseline.
- 提问:针对方案提问,不触发重跑。 Ask: ask about the plan without triggering a re-run.
回退与重跑Rollback and re-run
可以回退到更早的阶段重做(仅列出早于当前的阶段,防止误跳)。已写入磁盘的产物会被识别,可复用的部分不重新生成。 You can roll back to an earlier stage and redo it. Only earlier stages are listed, to prevent skipping forward by accident. Artifacts already on disk are detected and reused rather than regenerated.
启动方式Starting a workflow
- 右侧工作流面板点「启动」。Click Start in the Workflow panel on the right.
- 在输入框输入
/并选择一条工作流。Type/in the composer and select a workflow. - 用自然语言描述完整的开发需求,主代理识别后通过 MCP 发起方案门供确认。纯提问、讨论或单处小改动不会触发。 Describe a complete development task in natural language. The main agent detects it and raises a plan gate via MCP for confirmation. Questions, discussion and single small edits do not trigger it.
阶段与自定义阶段Stages and custom stages
内置阶段Built-in stages
| Key | 阶段Stage | 说明Description |
|---|---|---|
requirement |
需求评估Requirement | 将输入整理为明确的需求,并输出关联代码清单turns the request into a defined requirement and lists the related code |
design |
技术方案设计Design | 根据需求编写技术方案文档,按项目分节writes the technical design document, sectioned per project |
develop |
代码开发Develop | 按方案编写代码,通常按项目扇出并行执行implements the design, usually fanned out per project |
test |
写单测Test | 补充测试并执行adds tests and runs them |
review |
代码 CRCode review | 审阅改动,支持多镜头并行reviews the diff; supports multi-lens fan-out |
以上阶段均为可选。例如只包含「需求 → 开发」两步,或跳过测试和 CR,均为有效配置。 All built-in stages are optional. A workflow of only Requirement → Develop, or one that skips Test and Review, is valid.
多镜头代码 CRMulti-lens code review
代码 CR 支持按视角并行扇出:正确性、安全、性能、规范各由一个评审代理负责,结束后合并为一份报告。默认启用全部四个视角,可按需关闭。 Code review can fan out by lens: one reviewer agent each for correctness, security, performance and conventions, merged into a single report. All four are enabled by default and can be turned off individually.
自定义工作流Custom workflows
工作流不是固定链路。可保存多条命名工作流,每条有各自的阶段组合;使用时在右侧面板选择,或在输入框输入 / 选择。
Workflows are not fixed chains. You can save multiple named workflows, each with its own stages, and select one from the panel on the right or by typing / in the composer.
工作流中每个阶段可单独配置: Each stage in a workflow is configured independently:
- 名称、代理、模型、权限档位its name, agent, model and permission mode
- 单代理执行一次,或按项目扇出(及扇出的项目)single run or fan-out per project, and which projects
- 结束后是否暂停等待确认(门控)whether it is gated and waits for confirmation
- 是否必须向下游产出文档whether it must produce a document for downstream stages
- 前后是否挂载 Hookwhether hooks attach around it
工作流名称不允许重复(三层校验)。 Duplicate workflow names are rejected (validated at three layers).
自定义阶段Custom stages
阶段类型不限于内置项。设置 → 自定义阶段是一个全局库:定义一次「写 API 文档」「更新 CHANGELOG」「跑迁移脚本」等阶段,即可在所有工作流中引用。每条定义包含名称、默认代理、默认模型、prompt,以及是否门控、是否按项目扇出、权限档位。 Stages are not limited to the built-ins. Settings → Custom stages is a global library: define a stage such as "write API docs", "update the CHANGELOG" or "run migrations" once and reference it from any workflow. Each definition includes a name, default agent, default model, prompt, gating, per-project fan-out and permission mode.
工作流只存储对库条目的引用,修改库定义会同步到所有引用它的工作流。库条目被删除后,引用它的工作流不会出错,而是使用缓存的名称继续显示。 A workflow stores only a reference to the library entry, so editing the definition updates every workflow that uses it. If an entry is deleted, referencing workflows do not break; they fall back to the cached name.
Hook
Hook 是插入在阶段之间的辅助步骤。阶段用于完成主要的开发任务,Hook 用于执行附带的小任务。 A hook is an auxiliary step inserted between stages. Stages perform the main engineering work; hooks handle smaller side tasks.
挂载位置Attachment points
- 工作流开始前:例如拉取最新代码、安装依赖、准备环境。 Before the run: e.g. pull the latest code, install dependencies, prepare the environment.
- 指定阶段结束后:例如方案设计完成后将文档同步到 wiki,代码开发完成后运行 lint。 After a given stage: e.g. sync the design doc to a wiki after Design, run lint after Develop.
- 工作流结束后:例如发送通知、更新看板、生成变更日志。 After the run: e.g. send a notification, update a board, generate a changelog.
执行方式Execution
每个 Hook 作为受限微代理在工作区根目录运行:仅加载为其配置的 Skill 和工具,输入为当前任务描述和上游产物列表,执行完成后以一句话汇报结果。遇到需要人工提供的信息(如缺少凭据、目标环境不明确)时,会向用户提问,而不是自行推测。 Each hook runs as a restricted micro-agent at the workspace root, with only the skills and tools configured for it. Its input is the current task description and the list of upstream artifacts; on completion it reports a one-line result. When it needs information only a person can supply (missing credentials, which environment to target), it asks instead of guessing.
Hook 在执行面板中显示为独立节点。Hook 失败会阻塞流水线,并提供三个选项:重跑、跳过、终止。 Hooks appear as their own nodes in the execution panel. A failed hook blocks the pipeline and offers three options: retry, skip, abort.
Hook 库Hook library
与自定义阶段相同,Hook 也有全局库(设置 → Hook 库),与挂载位置无关:定义一次,可挂载到任意工作流的任意位置。新建工作区时会复制当前库的快照,之后两者独立变更。 Like custom stages, hooks are kept in a global library (Settings → Hook library), independent of attachment point: define once, attach to any position in any workflow. Creating a workspace copies a snapshot of the current library; the two then change independently.
MCP 与委派MCP & delegation
myFlowForge 内置 Forge MCP 服务器,注入到支持 MCP 的代理中,目前包括 Claude Code、Codex、Cursor、Gemini、qoder、opencode、Qwen、Copilot 共八个。代理通过它调用应用,应用无需从输出文本中解析哪些是提问、哪些是方案。Pi、Kimi、Reasonix、Trae、Antigravity、DeepSeek 使用纯文本模式,没有 MCP 通道,改用文字指令作为后备。 myFlowForge includes a Forge MCP server that is injected into agents with MCP support: currently Claude Code, Codex, Cursor, Gemini, qoder, opencode, Qwen and Copilot. Agents use it to call into the app, so the app does not have to parse questions and plans out of free text. Pi, Kimi, Reasonix, Trae, Antigravity and DeepSeek run in plain-text mode without an MCP channel and fall back to a text directive.
| 工具Tool | 用途Purpose |
|---|---|
forge_ask |
向用户提问,在对话区显示为选项卡(支持自定义输入) ask the user a question, shown as an option card in the chat (with free-text input) |
forge_propose_plan |
提出工作流方案,并打开确认门等待批准 propose a workflow plan and open a gate for approval |
forge_write_artifact |
将产物(如方案文档)写入磁盘并登记,供下游阶段读取 write an artifact (e.g. a design doc) to disk and register it for downstream stages |
forge_handoff |
声明本阶段完成及产出的产物 declare the stage done and which artifacts it produced |
forge_delegate |
将具体操作委派给子代理,异步执行,进度实时显示在对话区 dispatch a concrete action to a sub-agent; runs async with progress streaming back into the chat |
主代理仅负责编排Main agent as orchestrator
对话区的主代理仅负责编排:不直接编写代码,也不启动 CLI 内部的子代理。所有执行操作通过 forge_delegate 委派给由 myFlowForge 编排的子代理,每一步均在执行面板中可见、可回溯。
The main chat agent is restricted to orchestration: it does not write code and does not start the CLI's internal sub-agents. All execution goes through forge_delegate to sub-agents orchestrated by myFlowForge, so each step is visible and traceable in the execution panel.
Skill / 命令 / 插件Skills, commands & plugins
原则:使用各 CLI 原生机制,不修改其配置Principle: use each CLI's native mechanisms; never modify its configuration
对于命令、Skill、插件和 MCP,myFlowForge 只读取各 CLI 自身的目录和子命令,不定义额外格式,也不改写任何 CLI 的配置文件。界面中显示的内容与终端中一致;停用 myFlowForge 后,各 CLI 保持原状。 For commands, skills, plugins and MCP, myFlowForge reads only each CLI's own directories and subcommands. It defines no format of its own and never rewrites any CLI's config file. What the app shows matches what the terminal shows; if you stop using myFlowForge, your CLIs are unchanged.
读取位置Read locations
| 类型Type | 位置 / 命令Location / command |
|---|---|
| 命令 / promptCommands / prompts | ~/.claude/commands · ~/.codex/prompts · ~/.cursor/commands · ~/.qoder/commands同时读取工作区内的同名目录plus the same directories inside the workspace |
| Skill | ~/.claude/skills · ~/.codex/skills · ~/.cursor/skills · ~/.qoder/skills · ~/.agents/skills |
| CLI 原生插件Native CLI plugins | claude plugin · codex plugin(安装 / 卸载 / 列表 / 市场,均通过各自的子命令) (install / remove / list / marketplace, via their own subcommands) |
| MCP | claude mcp · codex mcp(list / get / login / logout) (list / get / login / logout) |
注意:上表并非硬编码。myFlowForge 会先执行 <bin> mcp --help / <bin> plugin --help,检测当前版本支持的子命令,据此启用界面中对应的按钮。CLI 新增子命令时无需等待 myFlowForge 发版。
Note: this table is not hard-coded. myFlowForge first runs <bin> mcp --help / <bin> plugin --help to detect which subcommands the installed version supports, and enables the corresponding buttons. New CLI subcommands do not require a myFlowForge release.
MCP 授权MCP authorisation
设置 → MCP 列出每个 CLI 已配置的 MCP 服务器及其登录状态,并支持直接登录或取消授权,无需在终端执行 claude mcp login。技能市场用于将 Skill 安装到读取 Skill 的 CLI 中。
Settings → MCP lists the MCP servers configured for each CLI and their sign-in status, and supports log in and revoke directly, without running claude mcp login in a terminal. The skills market installs skills into the CLIs that read them.
Skill
myFlowForge 扫描本机已安装的 Skill,并在工作区概览中显示加载状态。阶段和 Hook 均可指定要加载的 Skill,使对应步骤按 Skill 中定义的方法执行。 myFlowForge scans locally installed skills and shows their load status in the workspace overview. Stages and hooks can each specify skills to load, so that step follows the method defined in those skills.
命令与 promptCommands and prompts
磁盘上的命令 / prompt 文件可通过 / 菜单调用,并按当前代理过滤。例如 Codex 下不会列出仅 Claude 支持的命令。
Command and prompt files on disk are callable from the / menu, filtered by the current agent. For example, commands only Claude supports are not listed for Codex.
插件Plugins
插件中心支持安装官方目录中的插件。当前提供的扩展点为 statusbar-usage,用于在底部状态栏显示额度信息。官方额度适配器(Codex / Claude / Gemini / Cursor)均通过此扩展点接入。
The plugin centre installs plugins from the official catalogue. The currently available extension point is statusbar-usage, which renders quota information in the status bar. The official usage adapters for Codex, Claude, Gemini and Cursor use this extension point.
渠道机器人Channel bots
渠道机器人用于在手机上处理工作流中的交互,例如在不在电脑前时响应待批准的门。 Channel bots let you handle workflow interactions from a phone, such as approving a pending gate while away from the computer.
目前支持钉钉(Stream Mode 双向),已预留 Telegram 和飞书接口。连接后支持以下操作: Currently supported: DingTalk (two-way Stream Mode). Interfaces for Telegram and Feishu are reserved. Once connected, you can:
- 答确认门(批准 / 打回)answer gates (approve / send back)
- 看阶段结果和运行状态check stage results and run status
- 发起新对话start a new conversation
- 启动 / 推进 / 终止工作流start, advance or abort a workflow
工作区和会话以短 id 表示(w1、s2)。首次绑定需要配对码。推送粒度分三档:只推关键(需要决策的事项)、推阶段、全推。
Workspaces and sessions are referenced by short ids (w1, s2). First-time binding requires a pairing code. Push levels: essential only (items requiring a decision), per stage, and verbose.
凭据只留在本机Credentials stay on your machine
机器人的 AppKey / Secret 保存在应用设置中,不写入仓库,不上传。可通过机器人操作工作区的范围取决于机器人所在的群和绑定的账号,建议使用私聊。 The bot's AppKey and Secret are stored in app settings, never in the repo and never uploaded. Who can operate your workspaces through the bot depends on which chat it is in and which account is bound; private chat is recommended.
外观定制Appearance
设置 → 外观提供以下选项: Settings → Appearance provides the following options:
- 主题皮肤Skins — 6 套原创主题:熔炉、极夜、墨山水、深海、合成波、苔庭。深色和浅色配色分别校准了对比度。 six original themes: Forge, Aurora, Ink, Abyss, Synthwave, Mossgarden. Light and dark palettes are contrast-tuned separately.
- 强调色Accent colour — 12 种可选,深浅模式各有对应的明度。 twelve options, each with separate light- and dark-mode lightness.
- 壁纸Wallpaper — 内置画廊或自定义图片;可只覆盖对话区或覆盖整个窗口;支持调整透明度和纵向位置。 built-in gallery or a custom image; covers the chat area or the whole window; adjustable opacity and vertical position.
- 字体与字号Fonts and sizes — 字体按需下载;应用整体和对话区可分别设置 px 字号,并支持调整字重、行距、字间距。 fonts are downloaded on demand; the app and chat area have independent pixel sizes, plus weight, line height and letter spacing.
- 桌面宠物Desktop pet — 跟随焦点所在屏幕,显示代理动态预览和确认卡;支持宠物市场和上传自定义图片。 follows the focused screen, previews agent activity and shows confirmation cards; supports the pet market and custom image uploads.
窗口透明与磨砂Transparency & frosted glass
「磨砂度」滑杆取值 0 到 1,控制窗口从完全不透明到 macOS 原生毛玻璃效果。滑杆对应三档系统材质: The blur slider (0 to 1) controls the window from fully opaque to macOS native frosted glass. It maps to three system materials:
| 磨砂度Blur | 材质Material | 效果Effect |
|---|---|---|
0 | 关闭off | 完全不透明,性能开销最低fully opaque; lowest overhead |
< 0.4 | sidebar | 轻度透明,类似侧边栏slightly translucent, sidebar-like |
0.4 – 0.75 | under-window | 中度透明,桌面部分可见medium; desktop partially visible |
≥ 0.75 | fullscreen-ui | 透明度最高most translucent |
跨档位需要重启Changing material requires a restart
Electron 仅在创建窗口时设置材质。同一档内调整滑杆即时生效;跨档(包括开启或关闭磨砂)需要重建窗口,此时应用会提示重启。 Electron sets the material only when the window is created. Changes within one bucket apply immediately; crossing a bucket (including turning blur on or off) requires recreating the window, and the app prompts to relaunch only in that case.
从源码构建Build from source
前置:Node.js ≥ 20 与 npm,以及 git。 Prerequisites: Node.js ≥ 20 with npm, and git.
git clone https://github.com/flowForges/myFlowForge.git
cd myFlowForge
npm install
npm run dev常用脚本Scripts
| 命令Command | 说明Description |
|---|---|
npm run dev | 开发模式启动,渲染层热更新start in dev mode with renderer hot reload |
npm test | 运行全部测试(Vitest)run the full test suite (Vitest) |
npm run typecheck | 主进程与渲染层两套 tsconfig 一起类型检查type-check both the main and renderer tsconfigs |
npm run build | 构建生产包build the production bundle |
npm run dist:mac-all | 构建 Intel 和 Apple Silicon 两个 dmgbuild both Intel and Apple Silicon dmgs |
构建产物输出到 release/。修改 src/main/** 后需完全重启 Electron 才能生效,热更新仅刷新渲染层。
Build output goes to release/. Changes under src/main/** require a full Electron restart; hot reload only refreshes the renderer.
技术栈Stack
Electron + electron-vite · React 19 + TypeScript · xterm.js + node-pty(终端)· Model Context Protocol SDK(代理桥)· execa(进程控制)· zod(校验)· chokidar(文件监听)· Vitest + Testing Library(全程 TDD)· electron-builder(打包)。 Electron + electron-vite · React 19 + TypeScript · xterm.js + node-pty for the terminal · Model Context Protocol SDK for the agent bridge · execa for process control · zod for validation · chokidar for file watching · Vitest + Testing Library (TDD throughout) · electron-builder for packaging.
常见问题FAQ
是否需要为 myFlowForge 配置 API Key?Does myFlowForge need an API key?
不需要。myFlowForge 驱动本机已登录的 CLI,凭据由各 CLI 自行管理。myFlowForge 不保存 Key,不转发请求。 No. It drives CLIs already authenticated on your machine, and each CLI manages its own credentials. myFlowForge stores no keys and proxies no requests.
代码是否会被上传?Is my code uploaded anywhere?
myFlowForge 本身完全在本机运行,不向任何第三方服务器发送代码。代码的去向取决于所选编码代理自身的行为,与在终端中直接使用该代理相同。 myFlowForge itself runs entirely on your machine and sends no code to any third-party server. Where code is sent depends on the selected coding agent, the same as running that agent in a terminal.
macOS 提示应用「已损坏」macOS reports the app is "damaged"
原因是应用尚未进行代码签名,文件本身没有损坏。使用右键 → 打开,或执行 xattr -dr com.apple.quarantine /Applications/myFlowForge.app。详见下载页。
The app is not code-signed; the file is not corrupted. Use right-click → Open, or run xattr -dr com.apple.quarantine /Applications/myFlowForge.app. See the download page.
是否支持 Windows / Linux?Windows and Linux support
支持。提供 macOS(Apple Silicon + Intel)与 Windows x64 安装包;Linux 提供无界面的 daemon,作为执行主机使用,通过其他电脑或手机连接操作。 Yes. Installers are provided for macOS (Apple Silicon and Intel) and Windows x64. On Linux, a headless daemon runs as a host and is operated from another computer or a phone.
工作流是否会影响未提交的改动?Does a workflow affect uncommitted changes?
不会。每个项目运行在独立的 git worktree 上,且工作区存在未提交改动时工作流拒绝启动。中途终止会保留分支,不会丢弃任何内容。 No. Each project runs in its own git worktree, and a workflow will not start on a dirty tree. Aborting midway keeps the branch; nothing is discarded.
是否必须使用工作流?Is the workflow required?
不是必须的。myFlowForge 也可以作为支持随时切换模型、同时处理多个项目的多代理聊天客户端使用。工作流是按需启用的约束层。 No. myFlowForge can also be used as a multi-agent chat client with per-turn model switching and multiple projects. The workflow is an optional constraint layer enabled when needed.
项目状态Project status
持续开发中的个人开源项目,MIT 许可。目前发布的多为 beta 版本,新功能在 beta 通道发布。欢迎提交 issue 和 PR;项目采用 TDD,提交改动时请附带测试。 An actively developed personal open-source project under the MIT licence. Most releases are betas; new features ship on the beta channel. Issues and PRs are welcome. The project uses TDD, so please include tests with changes.
反馈与源码Feedback and source
文档与应用不一致,或有功能需求时,请提交 issue。 For discrepancies between the docs and the app, or feature requests, please open an issue.